1. What is a MESH Wearable alpha layer?
2. Wearing the Alpha Layer
3. Creating a New MESH Alpha texture
4. Making the Wearable Alpha Layer from the Texture
1. What is a MESH Wearable alpha layer?
Most mesh outfits include a wearable alpha clothing layer, what this does is make parts of the avatar invisible so that your avatar doesn’t show through the clothing when worn. This is important when it comes to fitting the mesh to your avatar.
The wearable alpha layer is made up of separate alpha textures, the alpha textures indicate the parts of the avatar which are invisible and which parts are visible. In this short guide we’ll be exploring how to create wearable alpha layers for your mesh outfits.
——————————————————————————————–
2. Wearing the Alpha Layer
This is the icon for a wearable alpha layer in the SL inventory:
To wear the alpha layer, simply right click and select Wear.
In Viewer 2 type viewers, multiple wearable alpha layers can be worn by right clicking the alpha layer and clicking Add as opposed to Wear.
Note: Choosing Wear will take off all the other alphas you were previously wearing and replace them with the current alpha.
——————————————————————————————–
3. Creating a New MESH Alpha texture
Start by opening your graphics program, Photoshop/Gimp etc.
Download the Avatar UV Guides from either Chip Midnight or Robin Wood.
Bring the UV part of the file into a new transparent document, the new document can be sized 512×512 or 1024×1024. We’re going to be using the UV as a guide since it displays the avatar UV layout – the position of the body,arms etc. on the texture.
The SL Avatar UV is divided into three parts, the Upper/Lower and Head. You can make alphas using any of these avatar UVs.
Look at your mesh outfit and decide which parts of your avatar will need to be hidden. These are typically parts of the avatar which are covered by the mesh clothing and that might poke through due to avatar shape variation or movement.
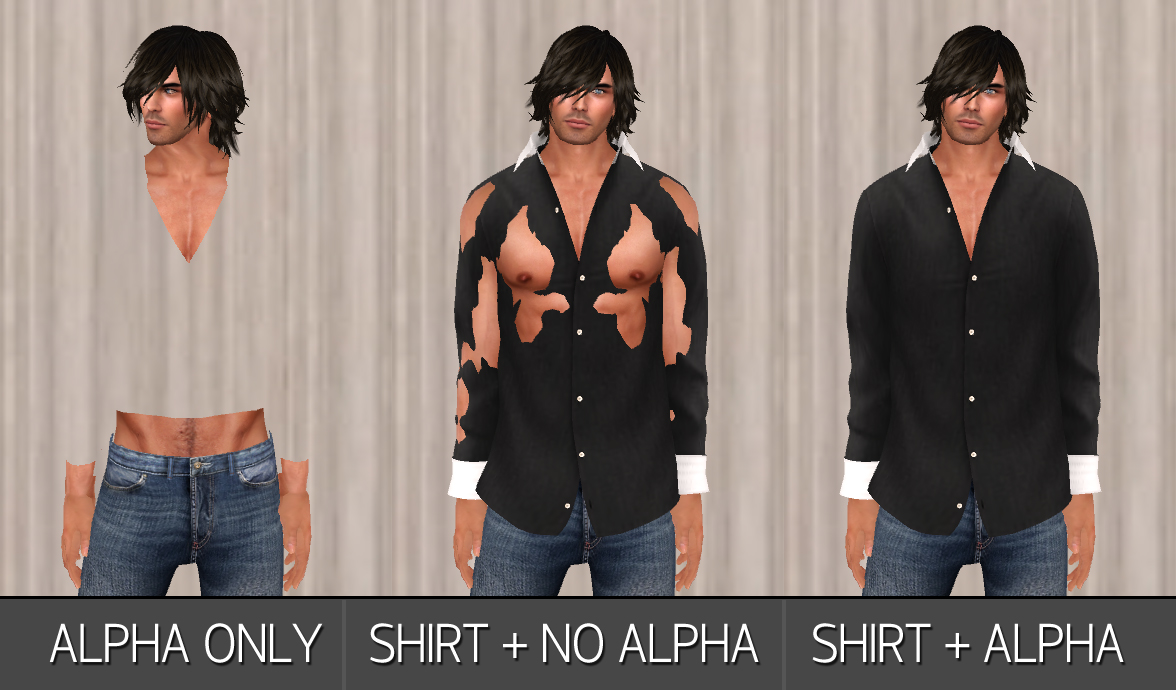
Here is an example for a mens shirt:
Notice how the parts of the avatar that are covered by the shirt are made invisible by the alpha. In the 2nd picture, the avatar isn’t wearing the alpha and the body is poking through the mesh clothing. The function of the alpha is to hide these parts.
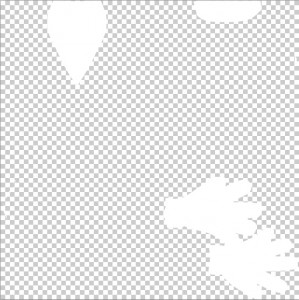
Here is what the Shirt Alpha Texture looks like in the graphics program:
The Grey & White checkered pattern indicates transparency. Here is the most important information to take note when creating alphas:
TRANSPARENT PARTS OF THE ALPHA WILL BE INVISIBLE ON THE SL AVATAR.
WHITE PARTS OF THE ALPHA WILL BE VISIBLE ON THE SL AVATAR.
So now we are at the important part which is defining the white areas of our alpha texture.
After you’ve decided which parts you want visible/invisible on your avatar, create a new layer, place it underneath the UV layer (you can decrease the UV layer opacity to make it less visible) and use the UV layer as a guide to select the area you’re going to be filling in white with.
We would recommend using the Pen Tool to create an accurate selection shape. You can also use the Polygonal Lasso if you’re unfamiliar with the Pen Tool, however this will be unable to create curved selections. Here is a useful Youtube Video Tutorial for the Pen Tool
Once you’ve made your selection, fill the area with white by using the Paint Bucket Tool.
Repeat this process for the other parts of the alpha you would like to be visible on your avatar.
Now that you’ve defined the white visible parts of your alpha, we can export the alpha texture ready to bring into SL.
Important Note: Remember to turn off the UV layer and any other guides before exporting. You only want the white parts to be exported.
Click File > Save As
Save the file in PNG format to ensure that the transparency data is saved in the file.
Upload the alpha image into SL ready for the next step.
——————————————————————————————–
4. Making the Wearable Alpha Layer from the Texture
Right click the clothing folder in your inventory and select New Clothes > New Alpha Mask (Might be named differently on other viewers)
A New Alpha Item will be created inside your clothing folder. Right click this item and choose Wear, then right click it again and choose Edit.
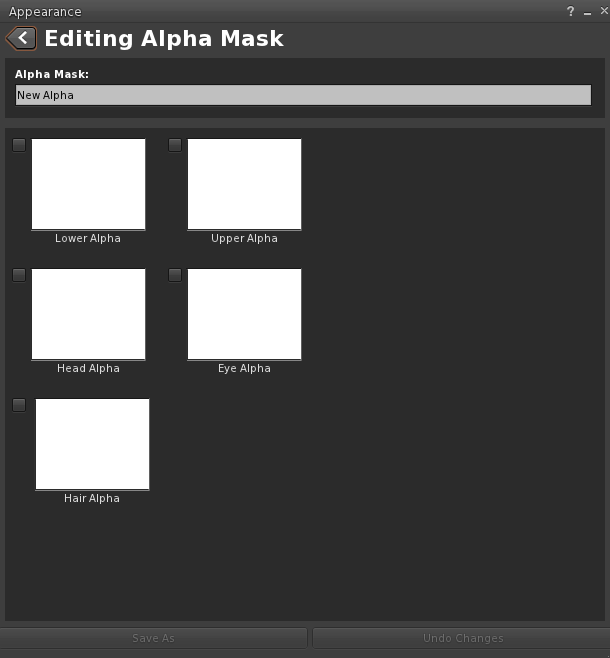
The Editing Alpha Mask Window will appear.
Enter a name for your new alpha in the text input box at the top.
The white squares represent the different parts of the avatar, the Upper/Lower/Head etc. You can apply one alpha texture to each of the squares.
Ticking the tick box under one of the squares will automatically put a blank alpha in and make that part of the avatar completely invisible. If you’re using an alpha texture you’ve created, leave the box unticked.
Drag your Uploaded Alpha Texture from your inventory into one of the white squares corresponding to the part of the avatar you created the alpha for. (The alpha won’t change until you’ve saved the alpha)
Note: Some viewers don’t support dragging the texture from your inventory, in which case left click the white square and select your alpha texture from the inventory list window that appears.
You can use multiple alpha textures to co-ordinate outfits, for example if you have a dress which requires both upper and lower parts of the avatar to be made invisible, you can drag alpha textures into the Upper Alpha and Lower Alpha squares. This can also apply if you wish to create an outfit with multiple mesh clothes (A shirt and jeans for example) and use one wearable alpha layer to hide both the upper and lower parts of the body. It is recommended to include separate alpha layers for individual clothing items for customers to wear separately.
Once you have placed the alpha textures into the squares, click Save to apply the changes to the alpha.
Now you’ve finished creating the wearable alpha layer.
Alpha Textures can also be exported from SL for further modification in your graphics program.
Thank you for reading this quick tutorial!
If you have any questions or suggestions for future tutorials – send an IM to Typhaon Nishi or Suzy Somerton.
For upcoming TD Quick tutorials, follow us on Facebook, Twitter & Plurk


