Mesh Templates: Introduction
This is a quick guide for those looking to get started using mesh templates and becoming acquainted with the new MESH technology in SL.
1. What is Mesh?
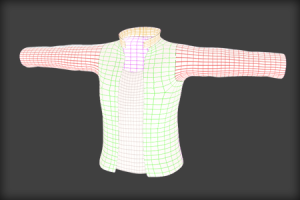
Mesh is a term referring to the type of 3d models which are now possible to be uploaded into SL . These objects can be made with a higher amount of detail than sculpties since sculpties are limited in the number of faces that can be used to make up the object. Mesh items are created in external 3d modelling programs such as 3ds Max, Blender, Maya and more.
2. Getting Started
To view mesh items in SL, you must use a mesh-enabled viewer. Below is a list of viewers which are capable of viewing mesh.
Mesh Compatible Viewers:
Official Second Life Viewer 3
Phoenix
Firestorm
Exodus
Cool VL Viewer
Singularity
Dolphin
3. How do I wear mesh clothing?
The Mesh clothing item will appear in your inventory with a regular object icon as opposed to jacket/pants etc. You can wear mesh clothing by right clicking the object in your inventory and clicking “Wear”. . You can wear the item on any attachment point on your avatar (eg. Upper Arm L) and it will still appear in the same position. This is due to a process known as “rigging” or “skinning” whereby the clothes creator has linked the clothing to move according to the way your avatar does in that position.
“Rigged” meshes cannot be resized when worn and will revert back to their original size if you change the size while they are placed on the ground.
4. Why does mesh come in different sizes?
Rigged mesh at this stage does not have the ability to fully re-size according to the different avatar sizing attributes therefore creators will usually supply a number of pre-defined sizes to cover a variety of shapes across SL. Our mesh templates usually come with either 4 or 5 sizes and come with the sizing guidelines for your customers convenience.
5. What is the wearable alpha clothing layer?
Most mesh outfits include a wearable alpha clothing layer, what this does is make parts of the avatar invisible so that your avatar doesn’t show through the clothing when worn. This is important when it comes to fitting the mesh to your avatar. Our mesh templates come with a wearable alpha layer and the alpha texture so you can make the alpha clothing layer with your name as the creator.
6. How do I modify the texture for mesh templates?
“Rigged” mesh clothing items are textured the same way you texture normal SL prim objects. Place the mesh object on the ground, right click it, go into edit mode, select the texture tab and place the texture in the texture box. Alternatively, you can drag the texture straight from your inventory onto the clothing item once it has been placed on the ground. Some mesh templates have multiple textures which are placed on different parts of the item.
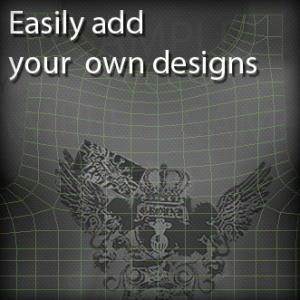
The process for adding your own modifications to the clothing texture will be the same as adding your designs/modifications to a non-mesh template. The mesh template is supplied with ready-to-use clothing textures as well as a UV grid to make texturing as easy as possible.
Mesh Clothing has its own unique UV Map
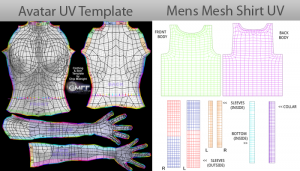
If you have created SL clothing before, you may be familiar with the Avatar UV Map Template which is offered by Chip Midnight/ Robin Wood. Basically a “map” showing where the flat texture is going to projected onto the avatar when worn. Mesh clothing does not adhere to the avatar UV map, each mesh item will have its own unique UV map suited to how it has been created.
Think of the UV Map as the different parts of the clothing unwrapped and flattened so that you can texture them easily. This way you can see where to add your creases/shading etc. One benefit of this is that the UV map is tailored to that specific item to minimise texture stretching. Also, for example on a shirt where using the avatar template only has one arm texture and mirrors it for both sides – a mesh shirt can have two different parts of the UV map separately for the left and right arm.
Some mesh template creators will not supply the actual clothing texture which goes on the clothing item and just provide you a basic shading texture along with the mesh model. Our mesh templates are supplied with the actual TGA clothing textures similar to our other non-mesh the templates used for placing on the model to give it a more “finished” look ready for your designs on the final product.
7. Assigning your name as the creator on Mesh Templates
You can assign your name to a mesh template by linking a prim to it.
1. Rez the mesh item on the ground.
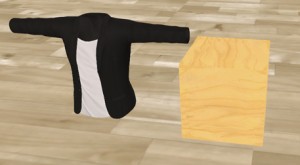
2. Build a new box on the ground next to the blazer.
3. Make the box smaller (about 0.03 for X,Y and Z) then position the box inside the mesh item.
4. Right click the mesh item and choose edit.
5. Hold SHIFT and left click the box you placed inside the mesh item.
6. From the top toolbar, click TOOLS and choose LINK.
7. Next, you can make the box invisible by using the invisible texture that came in this package.
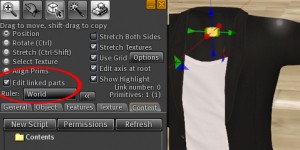
8. Right click the mesh item, choose edit, then from the edit menu tick EDIT LINKED PARTS and left click the box in the middle.
9. Click the Texture Tab from the edit window and drag the Invisible Texture into the Texture square. The box will now turn invisible.
10. The mesh item will now be linked to your box and the box will be the invisible root prim.
11. You can now rename the linked object and when you take it back into your inventory it will show your name as the creator.
8. What’s inside a Mesh Template Package?
PSD Download registration box – The box you place on the ground to retrieve your login details.
The actual mesh clothing Item in its various sizes.
UV Guide Texture – Guide which shows the different parts of the clothing unwrapped and flattened so that you can texture them easily. This way you can see where to add your creases/shading etc.
Full Perm Textures – These are the TGA clothing textures that are placed onto the clothing, be aware that to change the texture the mesh object must be placed on the ground.
Wearable ALPHA (wear me) – Worn as well as the mesh clothing, the wearable alpha layer makes parts of the avatar’s body invisible so they don’t show through the mesh.
ALPHA Texture – This is the texture that is used to create the wearable alpha clothing layer. The white parts are the parts which will remain visible on the avatar.
Here are some useful links with more information on Mesh:
http://dunessl.wordpress.com/2011/08/25/meshes-a-revolution/


